
mind2D.ai user guide
Here are the steps for turning a PowerPoint or PDF into a video narrated by a character. The screenshots show the Japanese interface on the Creator plan.
The app is currently displayed in Japanese. Text in 「」 refers to the name of a button or item shown on screen.
From file to video (5 steps)
- 1Choose an avatar (character)
- 2Choose a background
- 3Import your file
- 4AI writes the script
- 5Review and export
1. Create an account and sign in
You can start for free (Free plan). No credit card required.
Steps
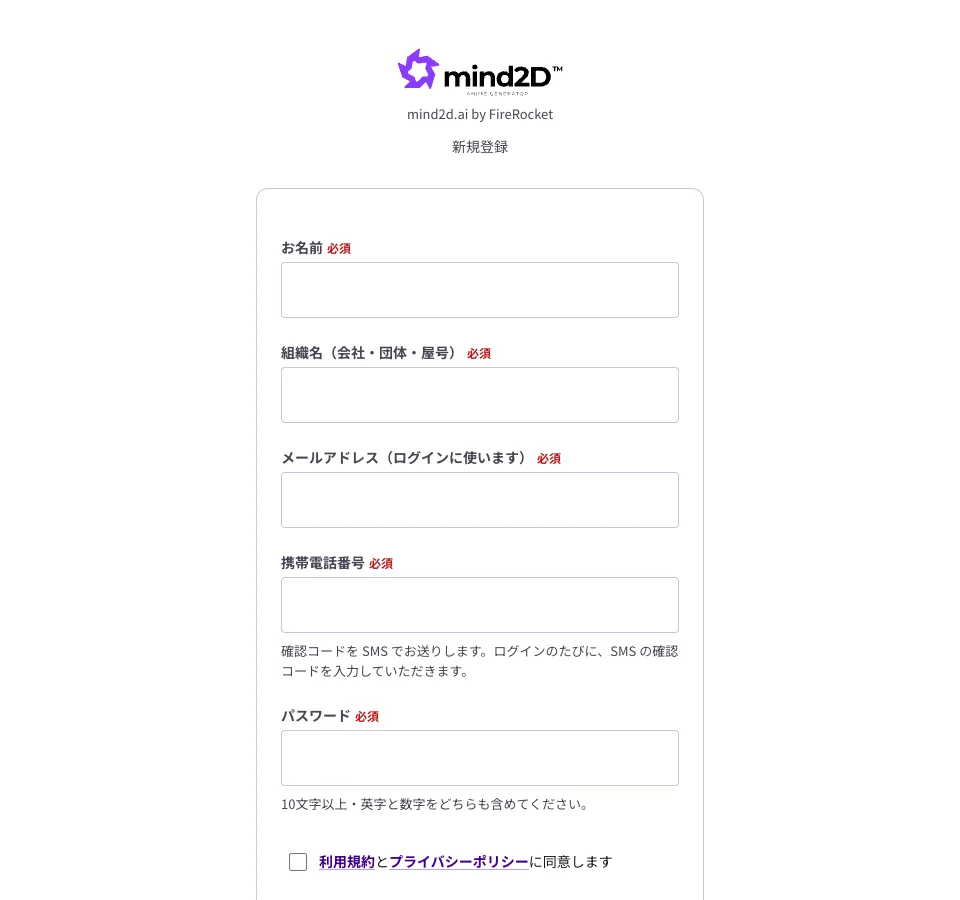
- Click “Start for free” to open the sign-up screen, then enter your name, organization, email address, mobile phone number, and password.
- Agree to the Terms of Service and Privacy Policy, then click “Send verification code”.
- Enter the 6-digit code sent by SMS and click “Register” to open your dashboard.
Good to know
- Your password must be at least 10 characters and include both letters and numbers.
- Sign-in uses two-factor authentication (an SMS verification code). On a new device, you’ll be asked for a code when you sign in.
- One Free plan per mobile phone number.
2. Dashboard
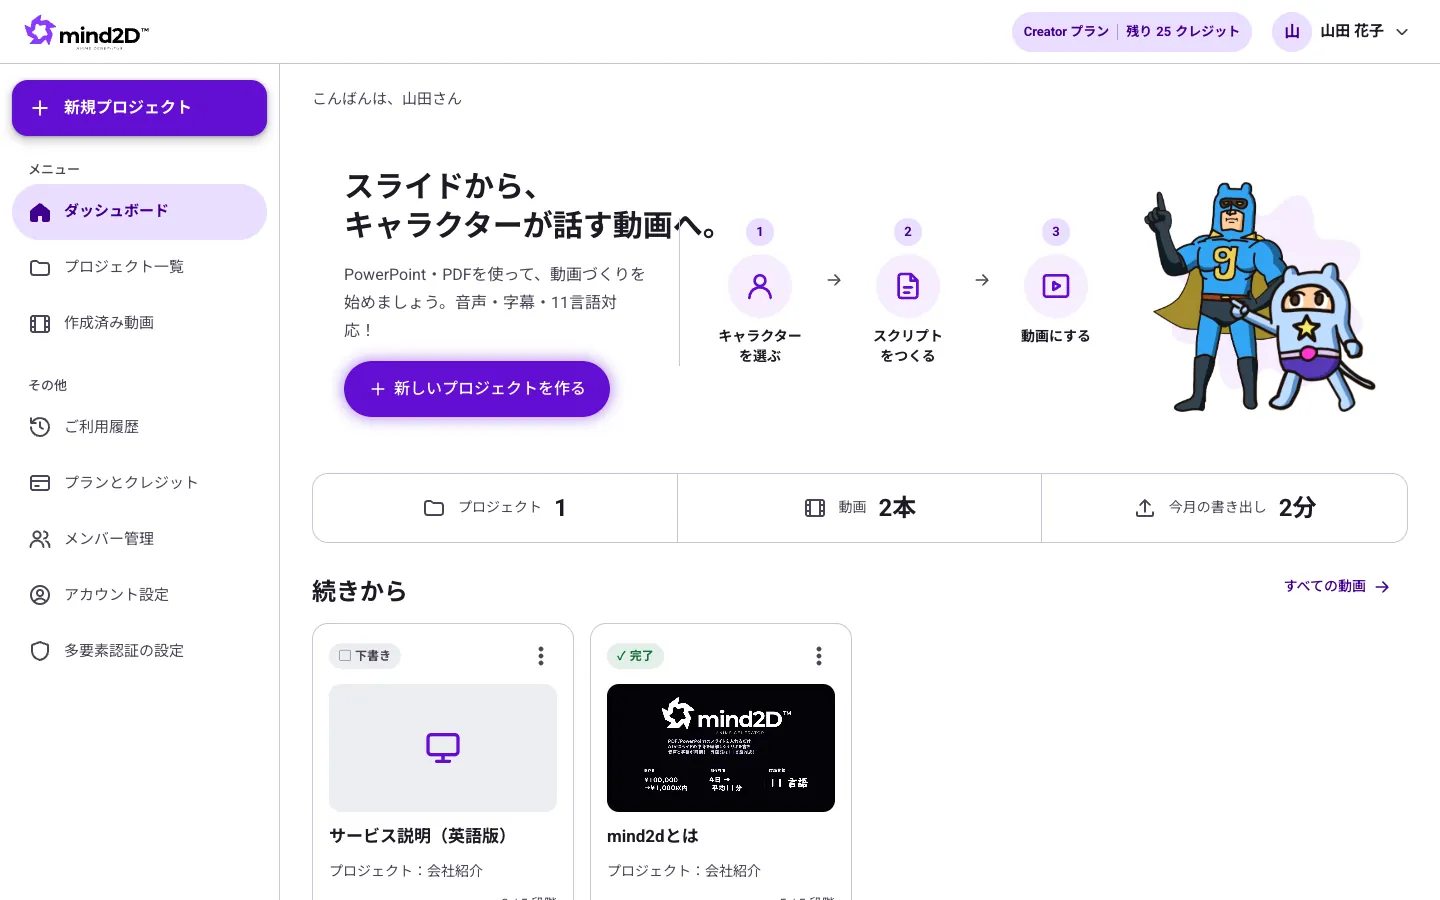
This is the first screen you see after signing in. From here you can start a new video or pick up where you left off.
Steps
- Click “Create a new project” to start making a video.
- “Resume” shows videos in progress and which step each one has reached.
- The left-hand menu opens your project list, finished videos, usage history, and plan and credits.
Good to know
- Your current plan and remaining credits appear at the top right of the screen.
3. Create projects and videos
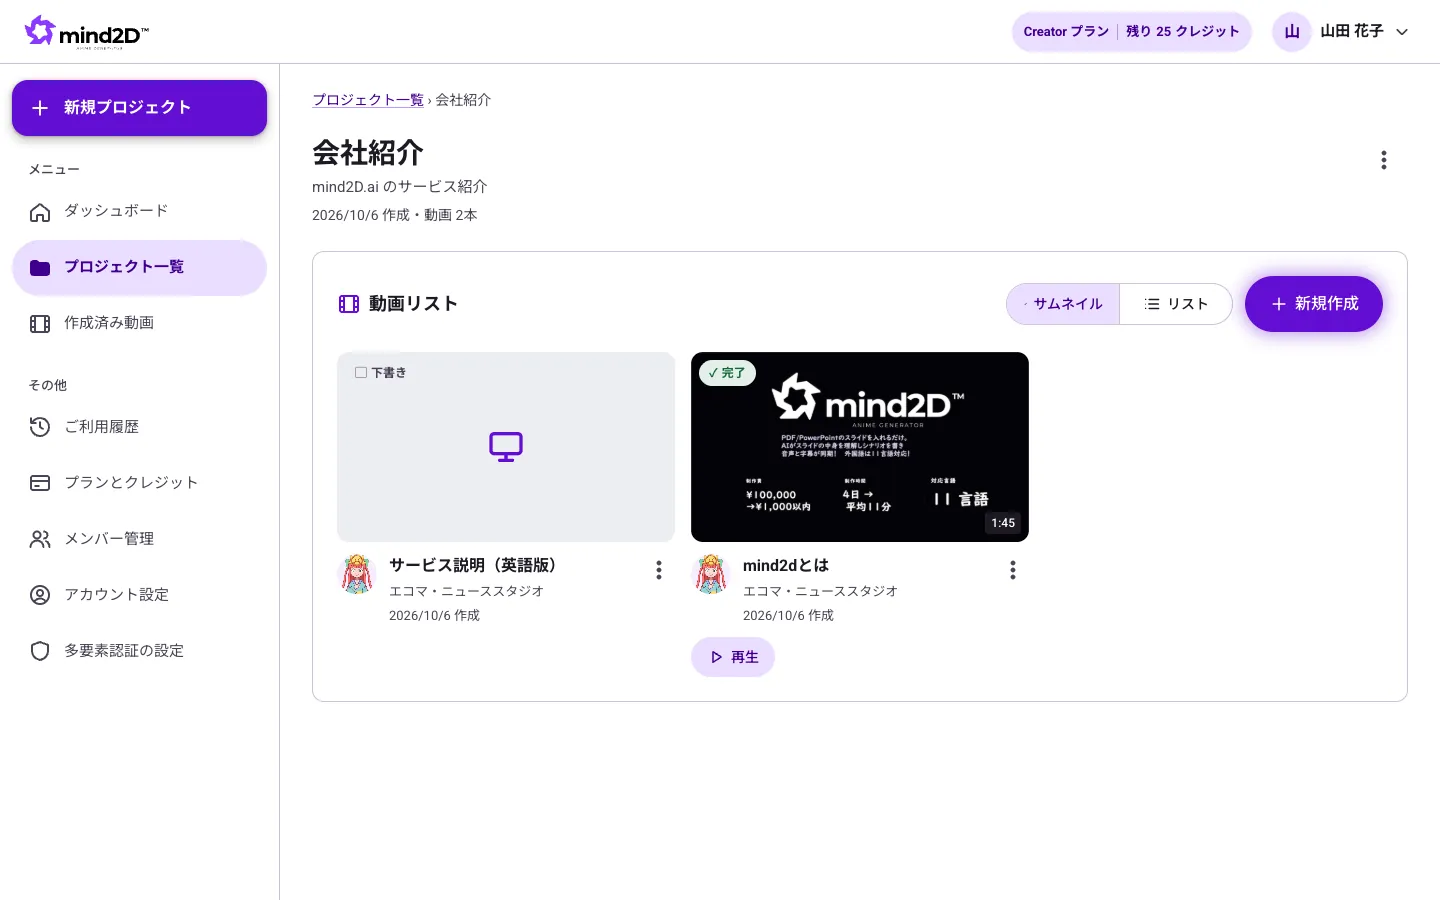
A project is a container for your videos (for example, “New hire training” or “Product overview”). You can put as many videos as you like in one project.
Steps
- Click “Create a new project”, enter a project name, and click “Create”.
- On the project screen, click “New”, enter a video title, and click “Create”.
- The 5 steps of video creation begin. If you stop partway, you’ll pick up from that step the next time you open it.
Good to know
- From a video’s ⋮ menu you can rename it, edit its description, delete it, or download it (once exported).
4. Choose an avatar (character)
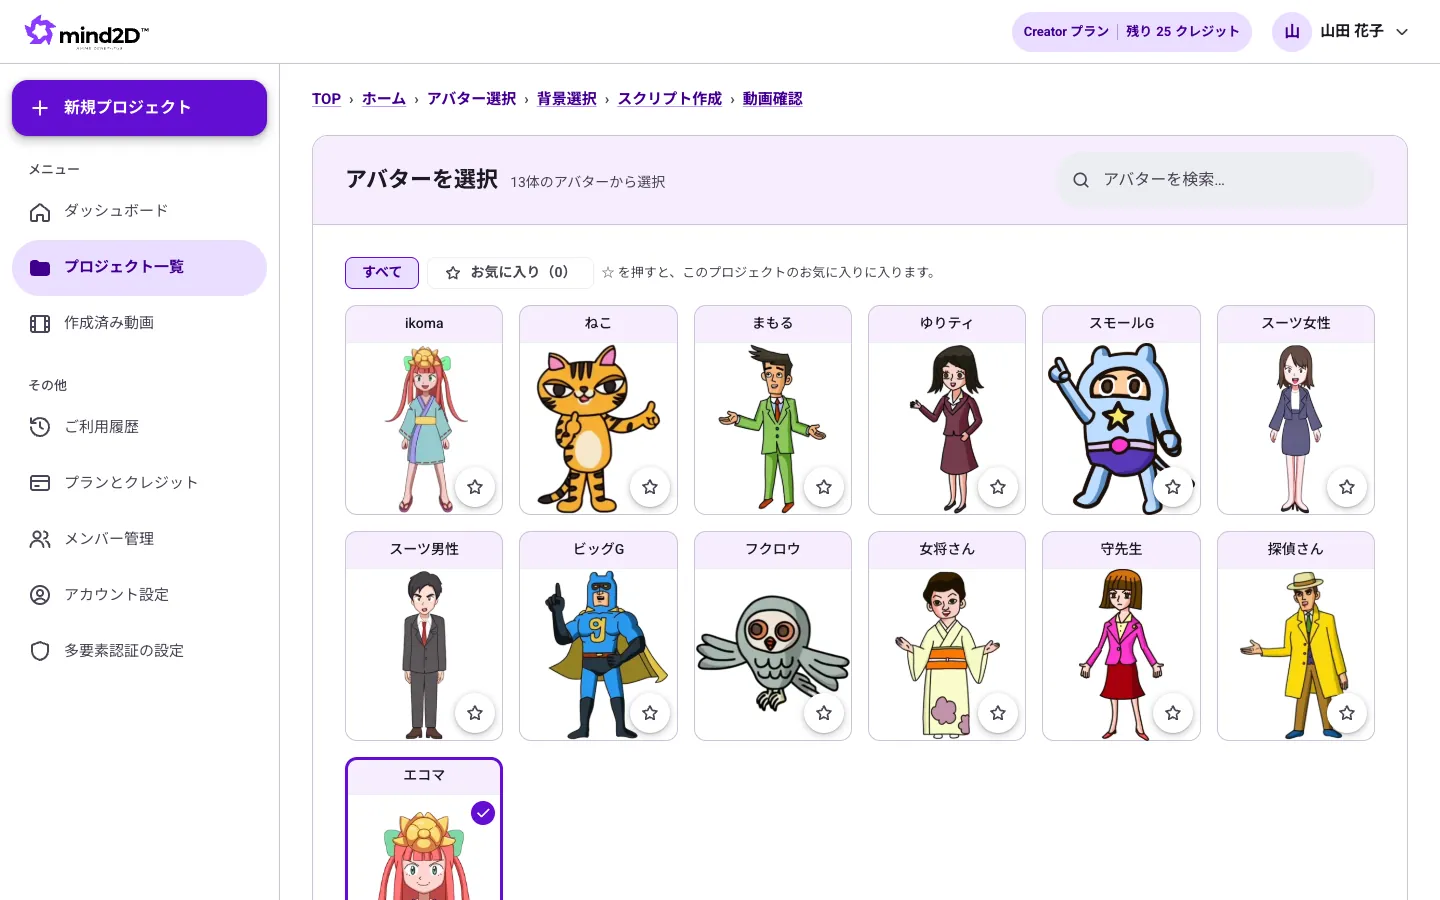
Choose the character who presents in your video. The voice is set to match the character you pick (you can change it later).
Steps
- Click the character you want from the list. Your choice is saved right away and you move to the next step.
- Click ☆ to add characters you use often to your favorites.
Good to know
- You can change the character and voice later on the video review screen.
5. Choose a background
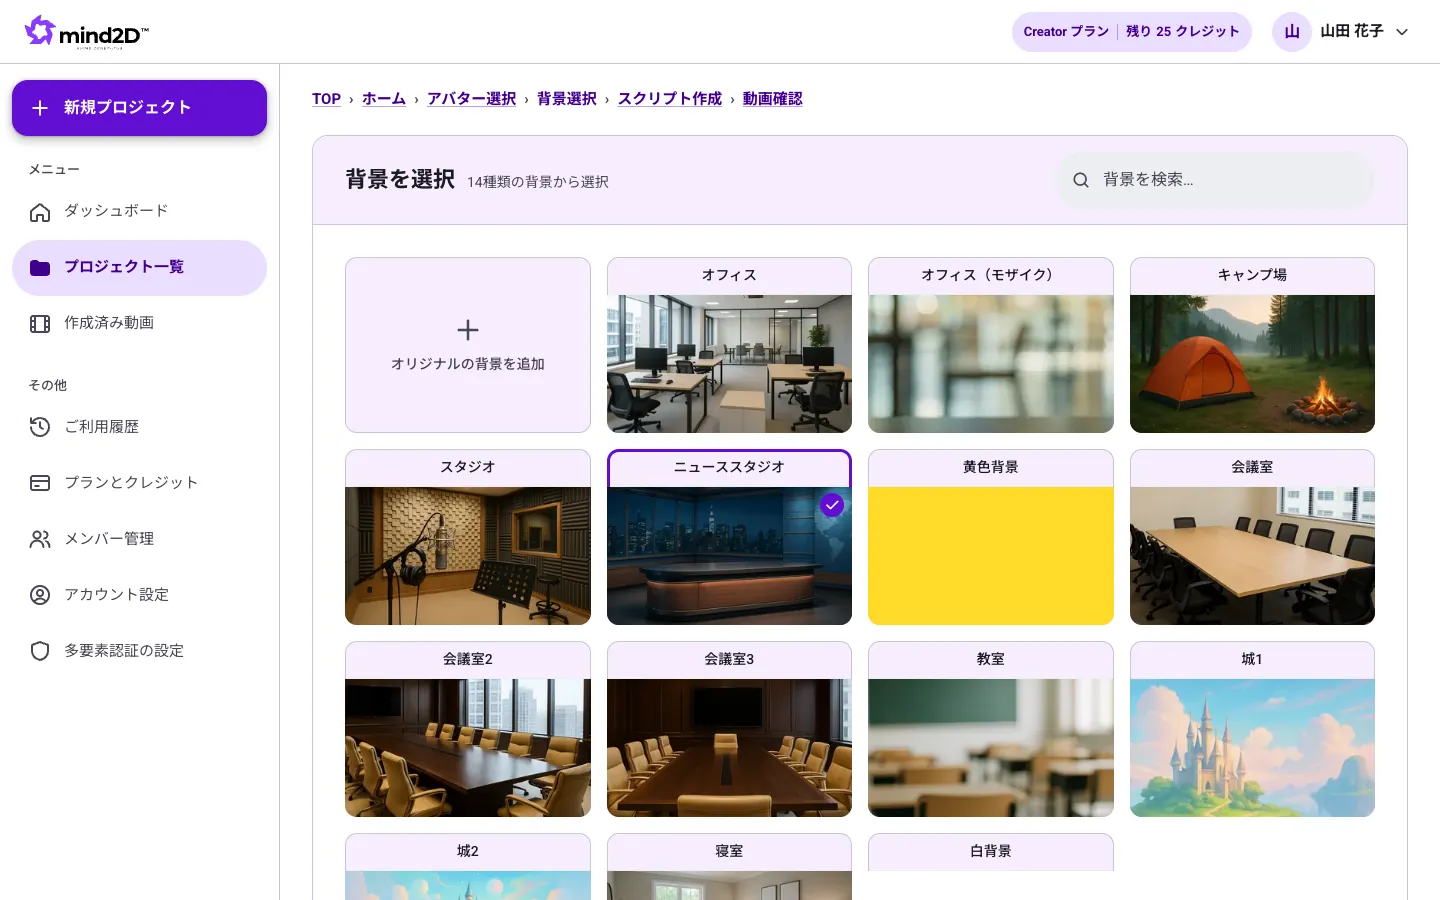
Choose the background shown behind the character and slides.
Steps
- Click a background from the list. Your choice is saved right away and you move to the next step.
Good to know
- “Add an original background”, which lets you use your own image (JPEG or PNG), is available on the Pro plan and above.
6. Import your file
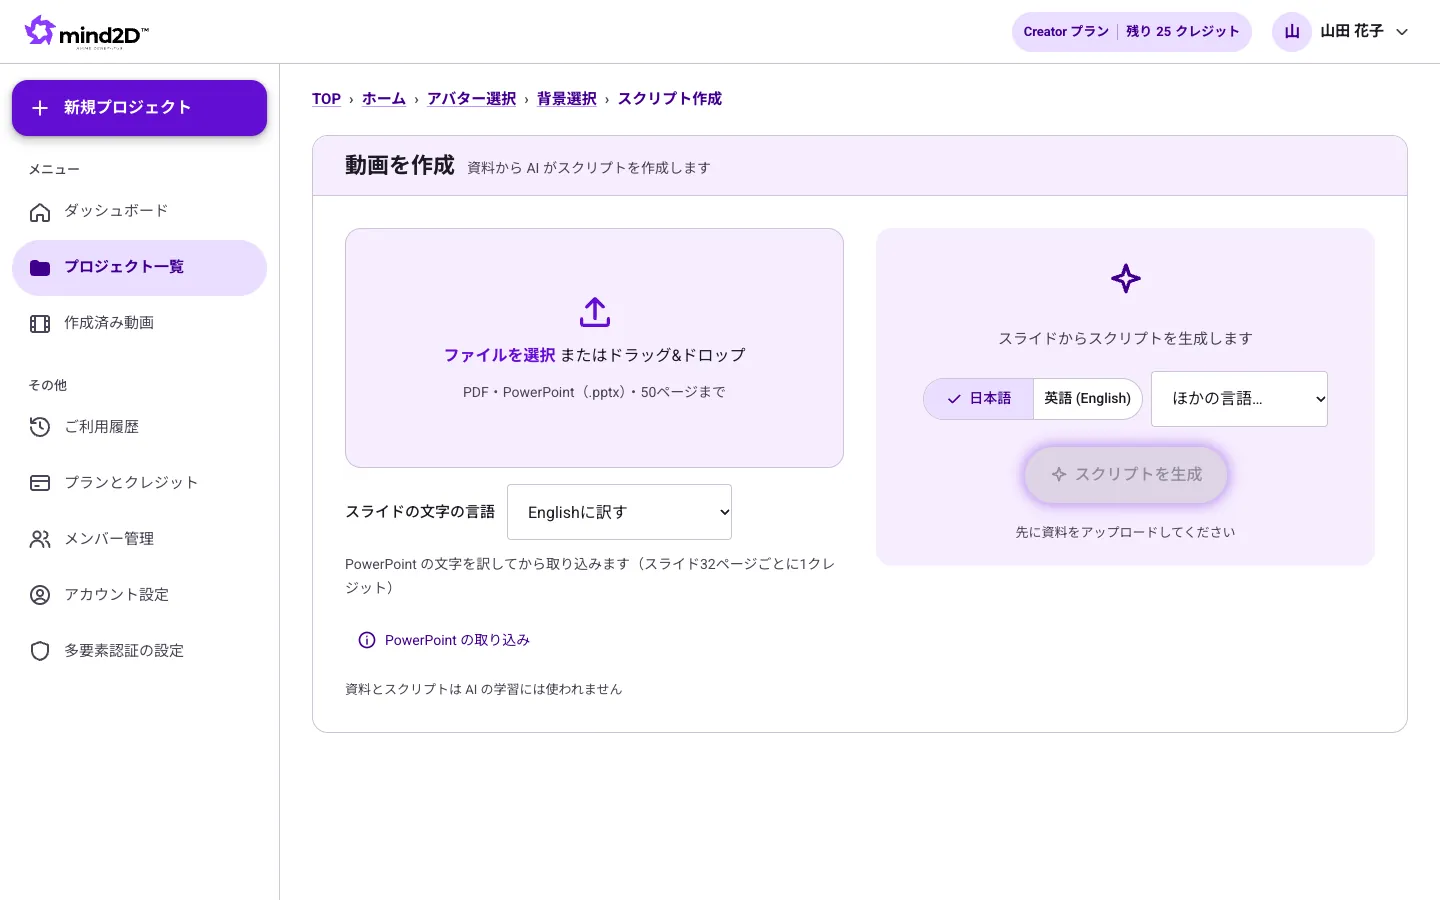
Import the slides your video will be based on. PowerPoint (.pptx) and PDF are supported.
Steps
- Click “Choose file”, or drag and drop your file into the box.
- Once the import finishes, your slides appear page by page on the left.
Good to know
- The number of pages you can import depends on your plan: up to 10 pages on Free, 50 on Creator, 100 on Pro, 150 on Business, and 200 on Enterprise.
- PowerPoint animations are imported as separate pages for each step. Text in your presenter notes is also used to write the script.
- Your files and scripts are never used to train AI.
7. Translate the text on your slides
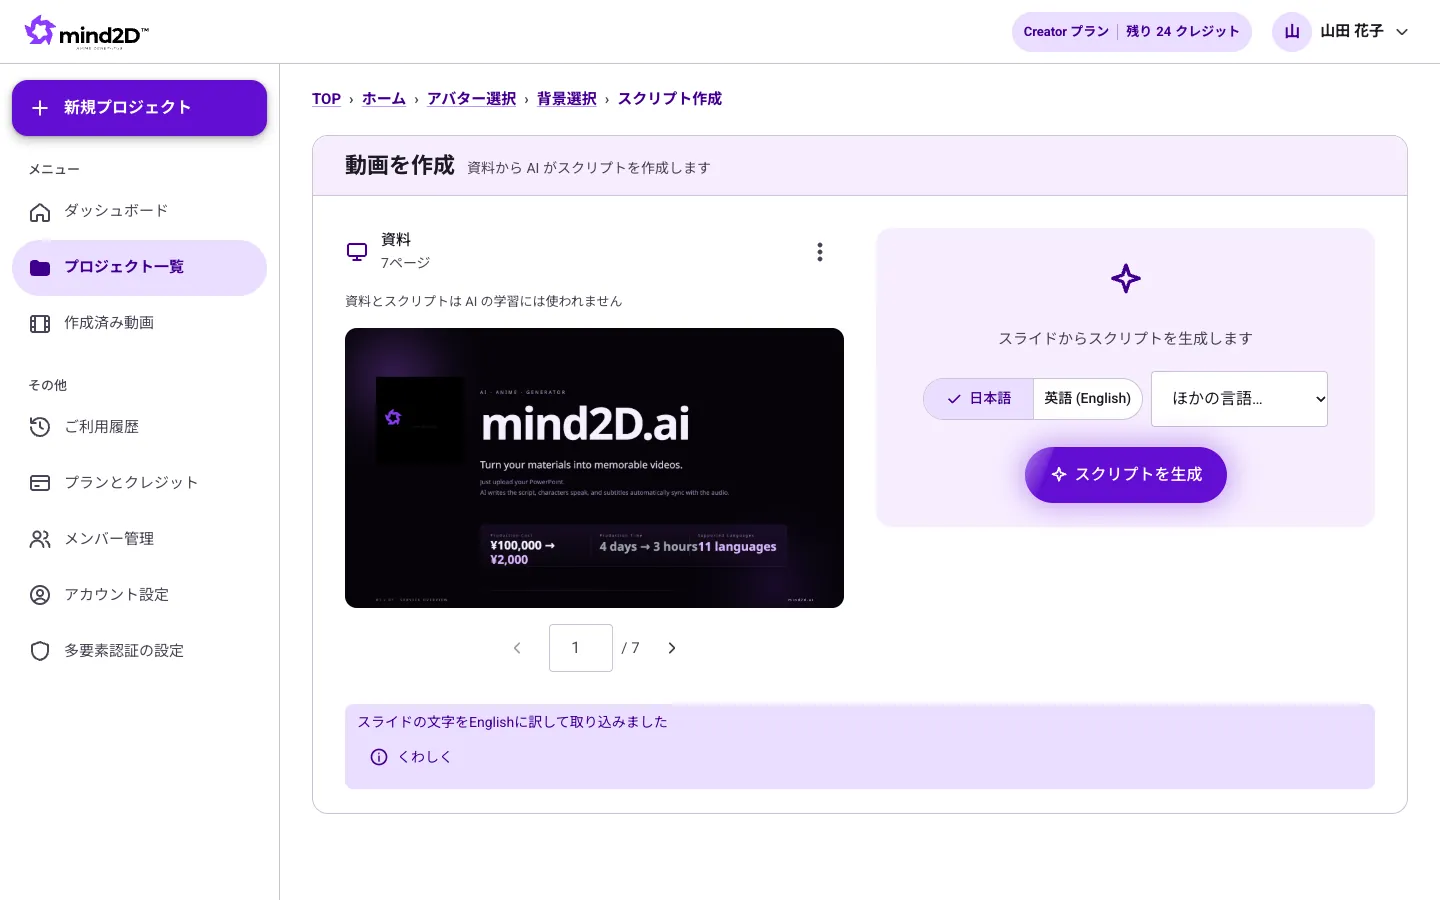
With PowerPoint files, you can translate the text on your slides as you import them. Use this to turn a Japanese deck into an English, Vietnamese, or other language video.
Steps
- Before adding your file, choose a language under “Slide text language” (the default is “Keep as is (no translation)”).
- Import the file as usual, and the slide text appears in the language you chose.
Good to know
- Font size, color, position, and figures stay exactly as they are. Only the text is translated.
- Uses 1 credit per 32 slides.
- Text in PDFs cannot be translated. Please try a PowerPoint (.pptx) file.
8. Let AI write the script (the narration)
AI reads your imported slides and writes the script your character will speak.
Steps
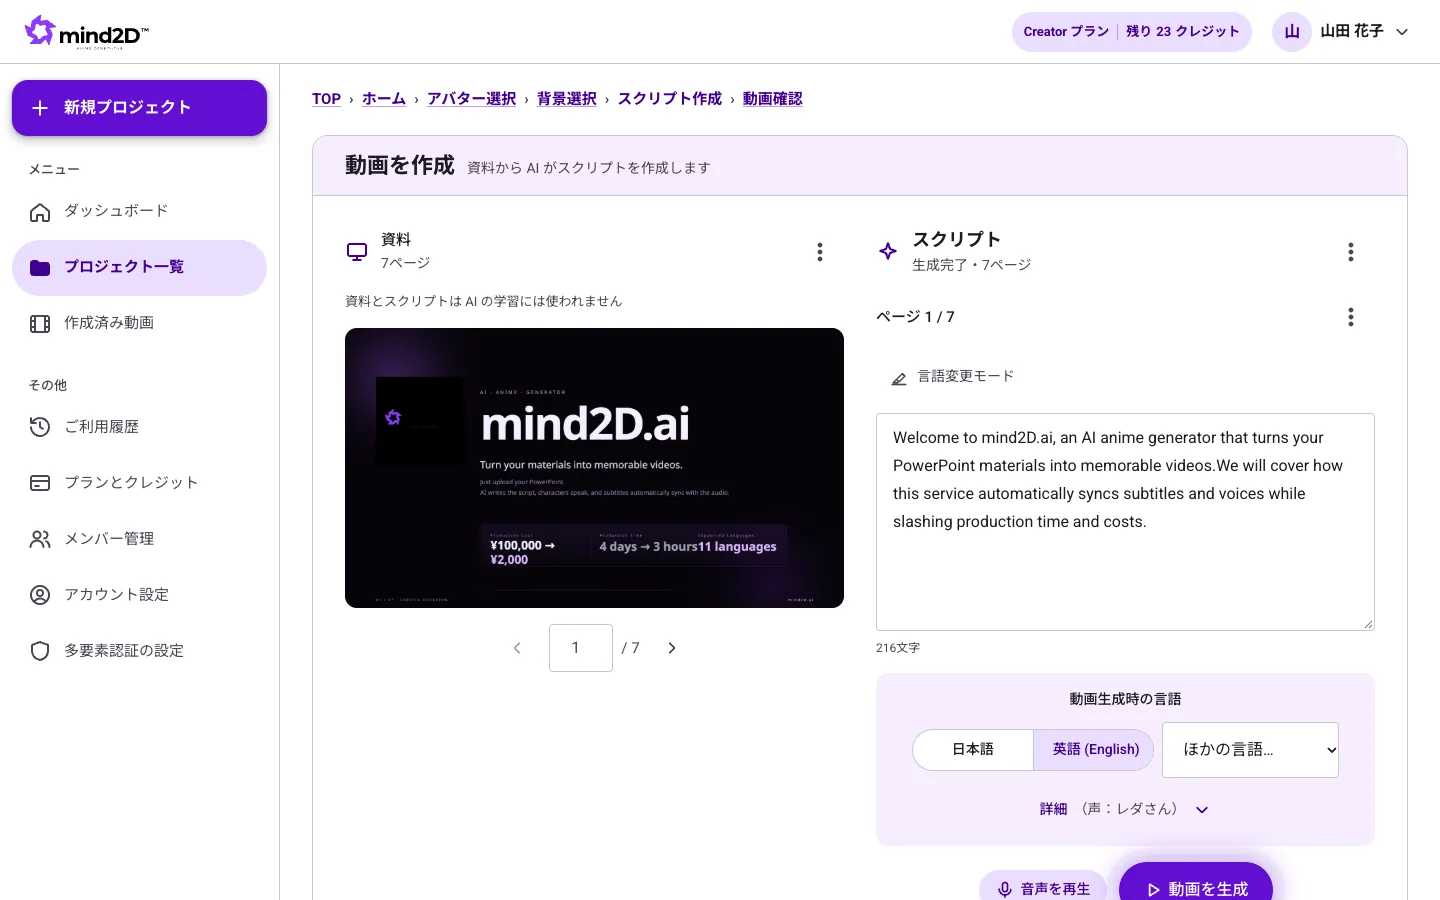
- On the right, choose the speaking language (Japanese, English, or another language).
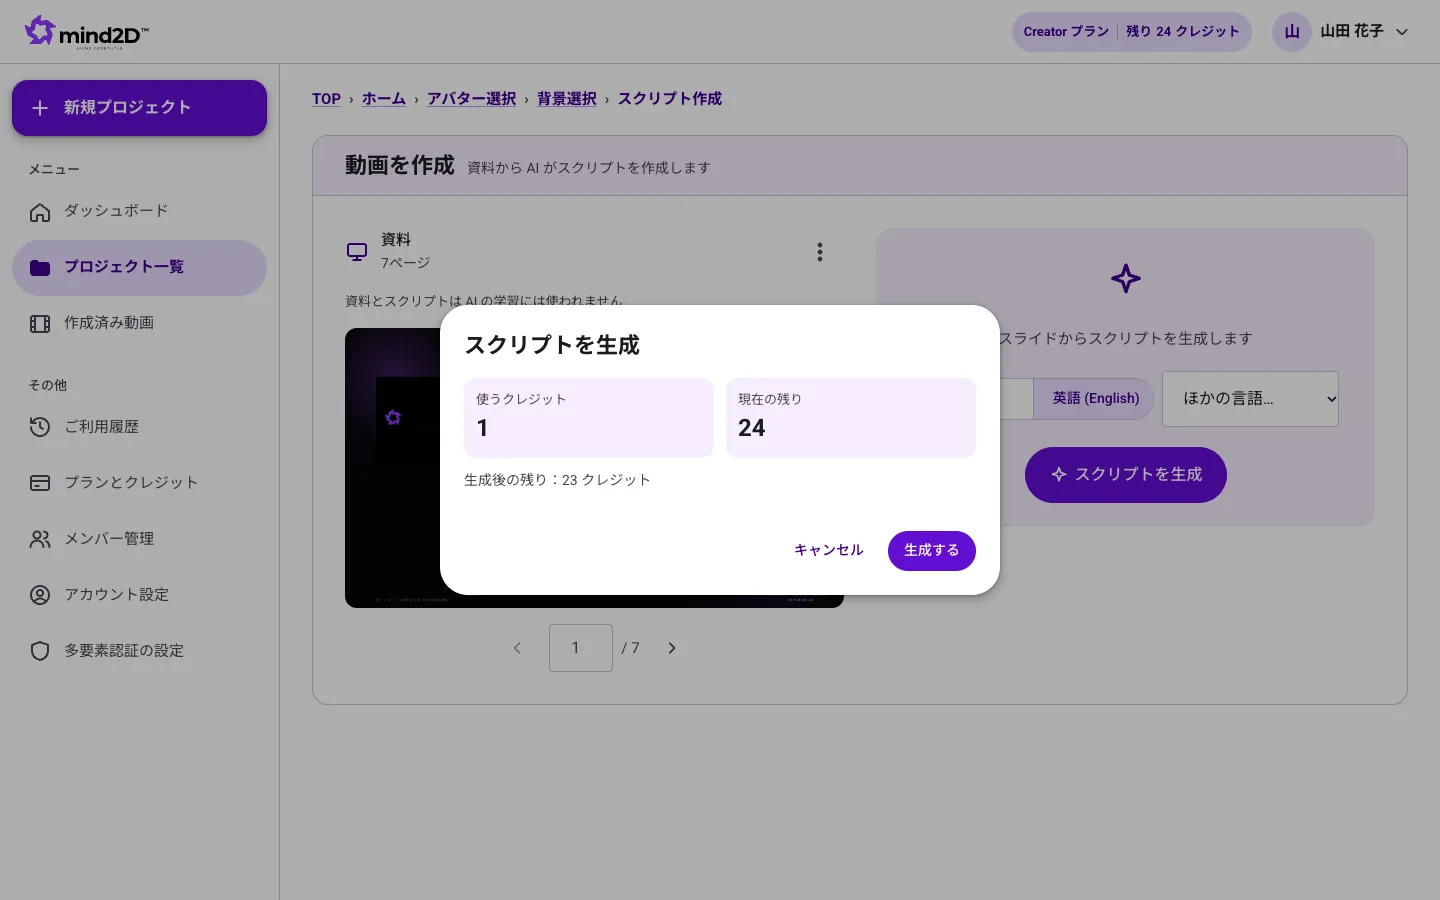
- Press "Generate script" to see the credits required and your balance, then press "Generate".
- The script appears in a field for each page. You can edit the text freely (it saves when you click outside the field).
- Press "Play audio" to hear the narration for that page.
- When you're happy, press "Generate video" to move on to the preview screen.
Good to know
- Script generation costs 1 credit per 14 pages (on the Free plan, 1 credit per run).
- To have just part of a sentence read in English, select that part in "Language switch mode".
9. Preview and fine-tune your video
Play back the finished video, check it, and fix anything you'd like to change.
Steps
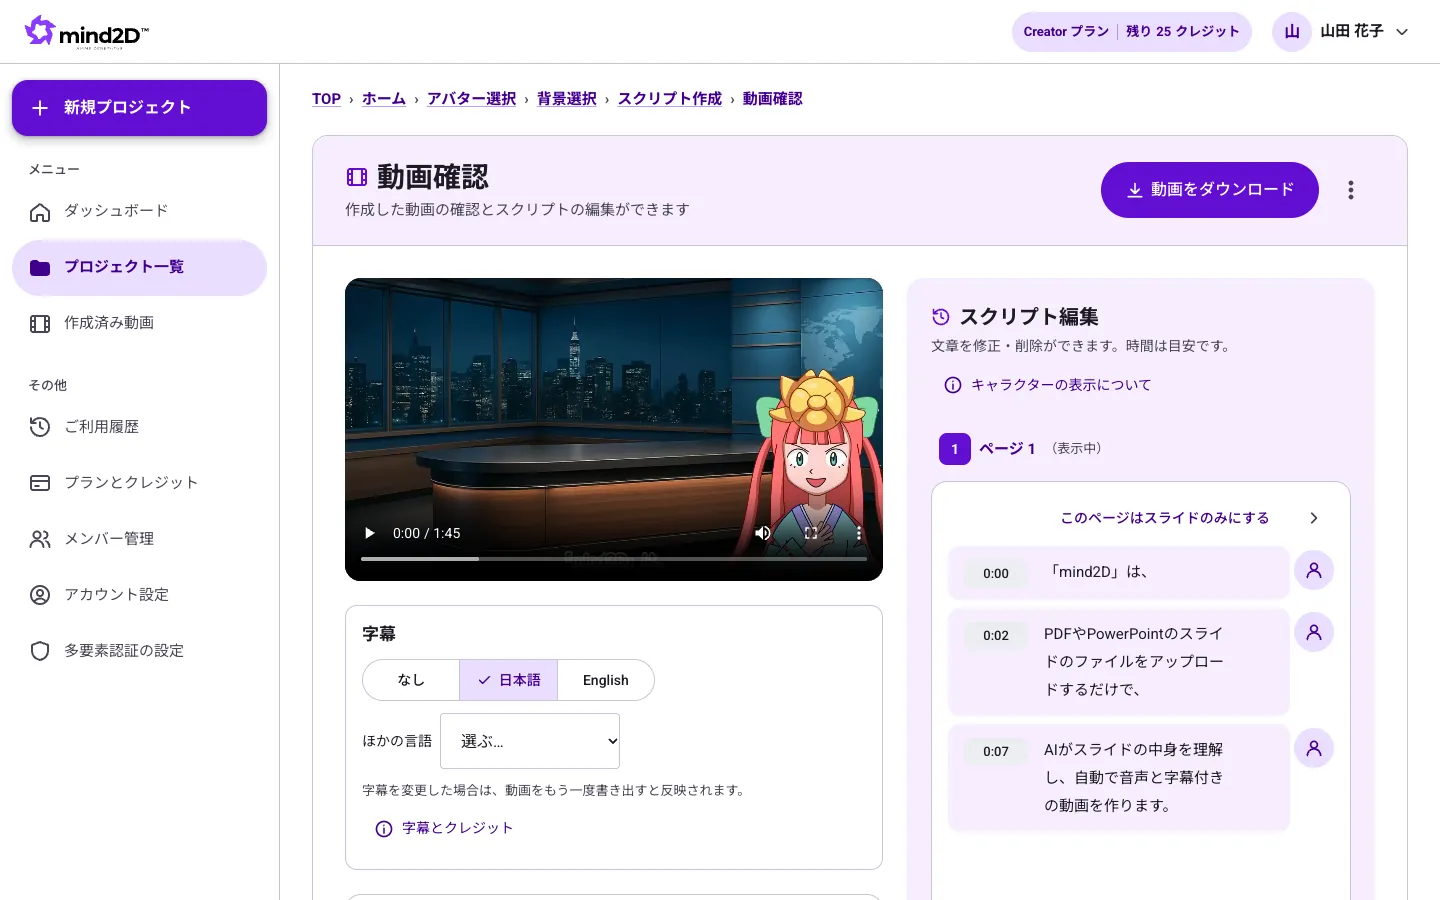
- Play it in the player on the left. In "Edit script" on the right, click a sentence, edit it, and press "Save".
- Under "Subtitles", choose none, Japanese, English, or another language.
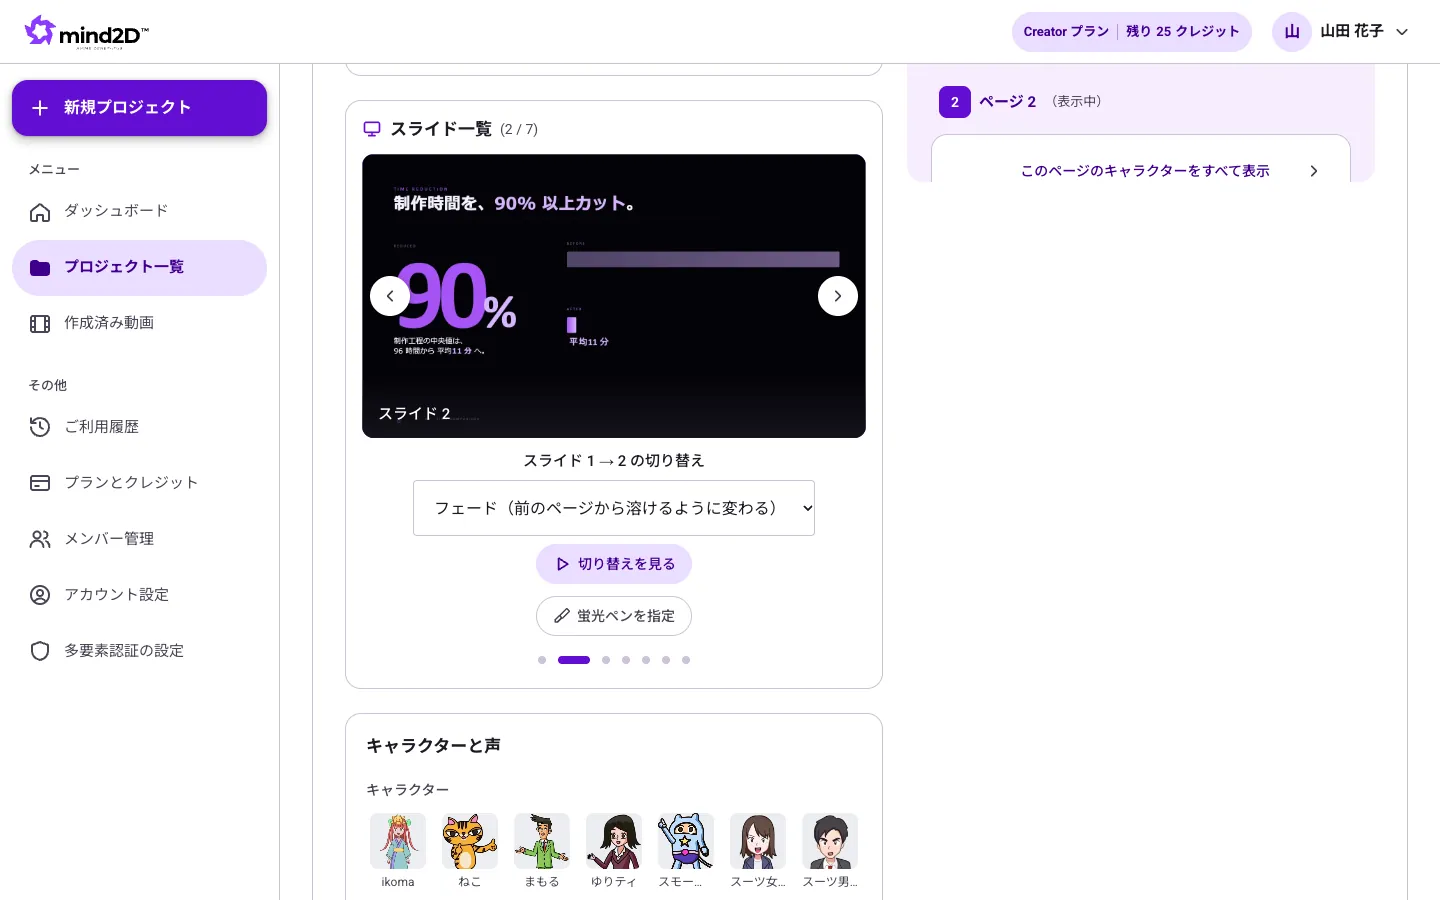
- Under "Slide list", choose how pages change (none, fade, slide, or zoom).
- Under "Character and voice", you can change the character and the narration voice.
- Click the person icon to show or hide the character while that sentence is spoken.
Good to know
- If you change anything after exporting, "Export with changes" lights up. Press it to export again with your edits.
- Regenerating audio after changing the voice uses credits.
10. Highlight the key points
Make the key points on a slide light up like a highlighter pen, in sync with the narration.
Steps
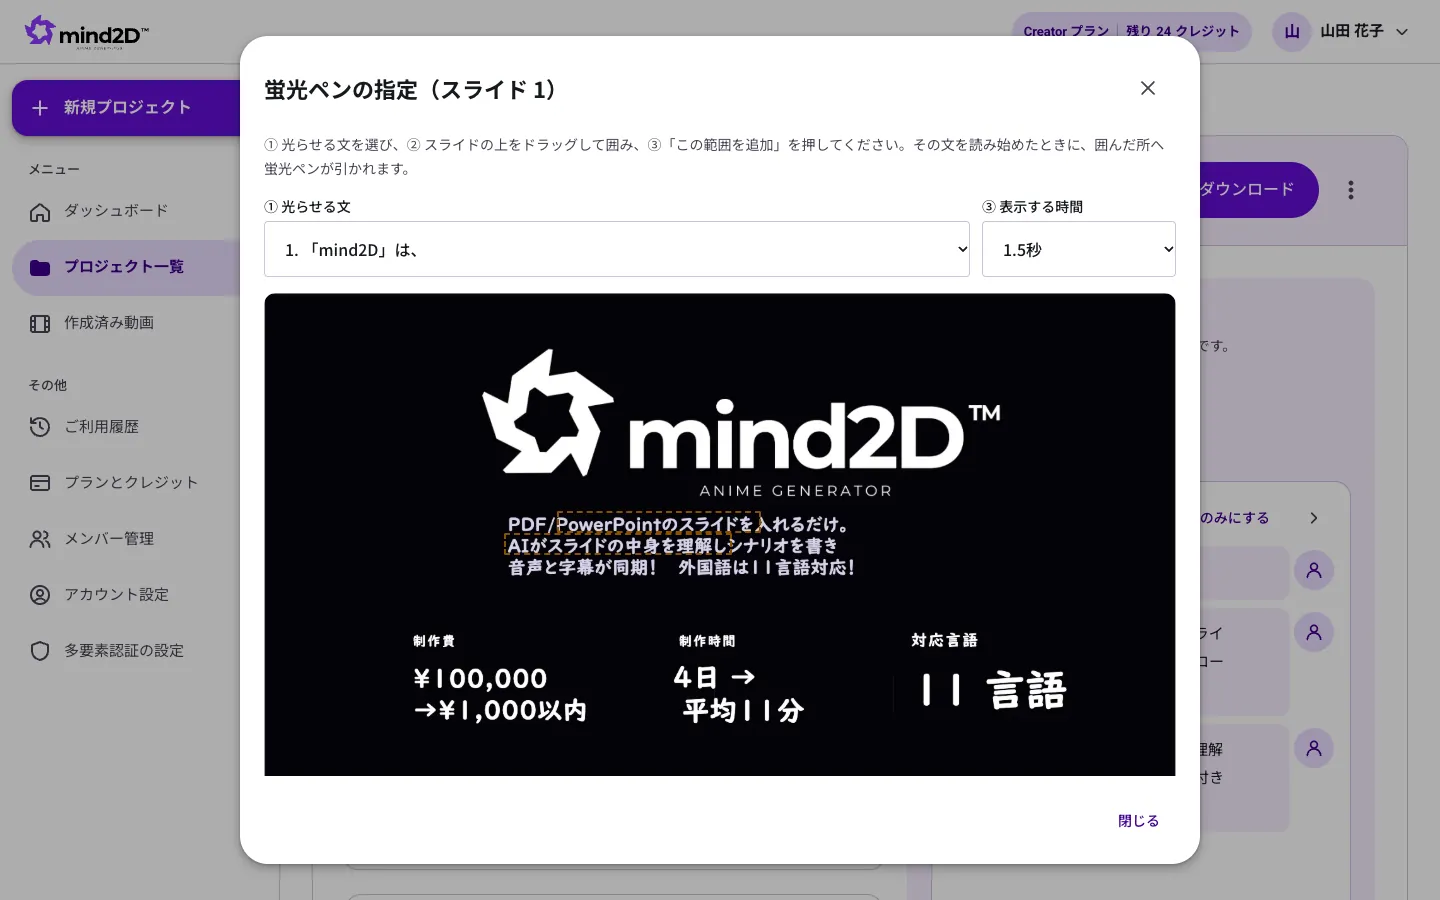
- In "Slide list", press "Set highlights".
- ① Choose the sentence to highlight on, ② drag across the slide to frame the area, ③ choose how long it shows.
- Press "Add this area" and the highlight appears as that sentence begins.
Good to know
- Turn on "Also use automatic highlights" and AI will highlight the spots it picks, too.
11. Export and download your video
Once everything looks good, export a downloadable video (mp4).
Steps
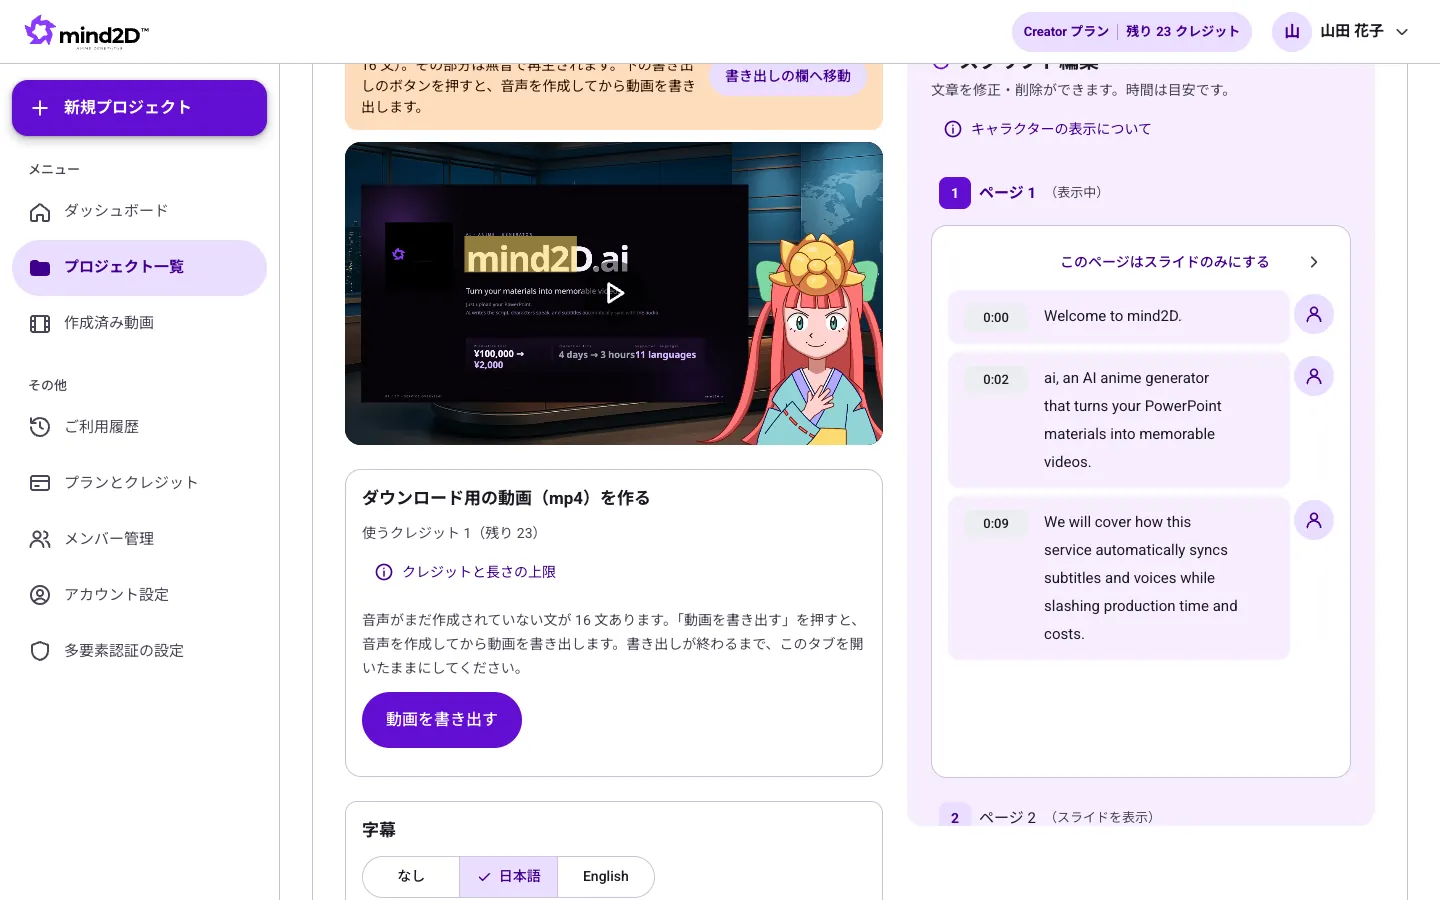
- In the "Create a downloadable video (mp4)" panel, check the credits required and press "Export video".
- If any sentences still have no audio, generate the audio first, then export.
- When the export finishes, save the mp4 from "Download video" at the top right of the screen.
Good to know
- Exporting runs inside your browser. Please keep this tab open until it finishes.
- Exporting costs 1 credit per 7 slide pages.
- The Free plan allows up to 1 exports, and videos include a watermark.
12. Plans and credits
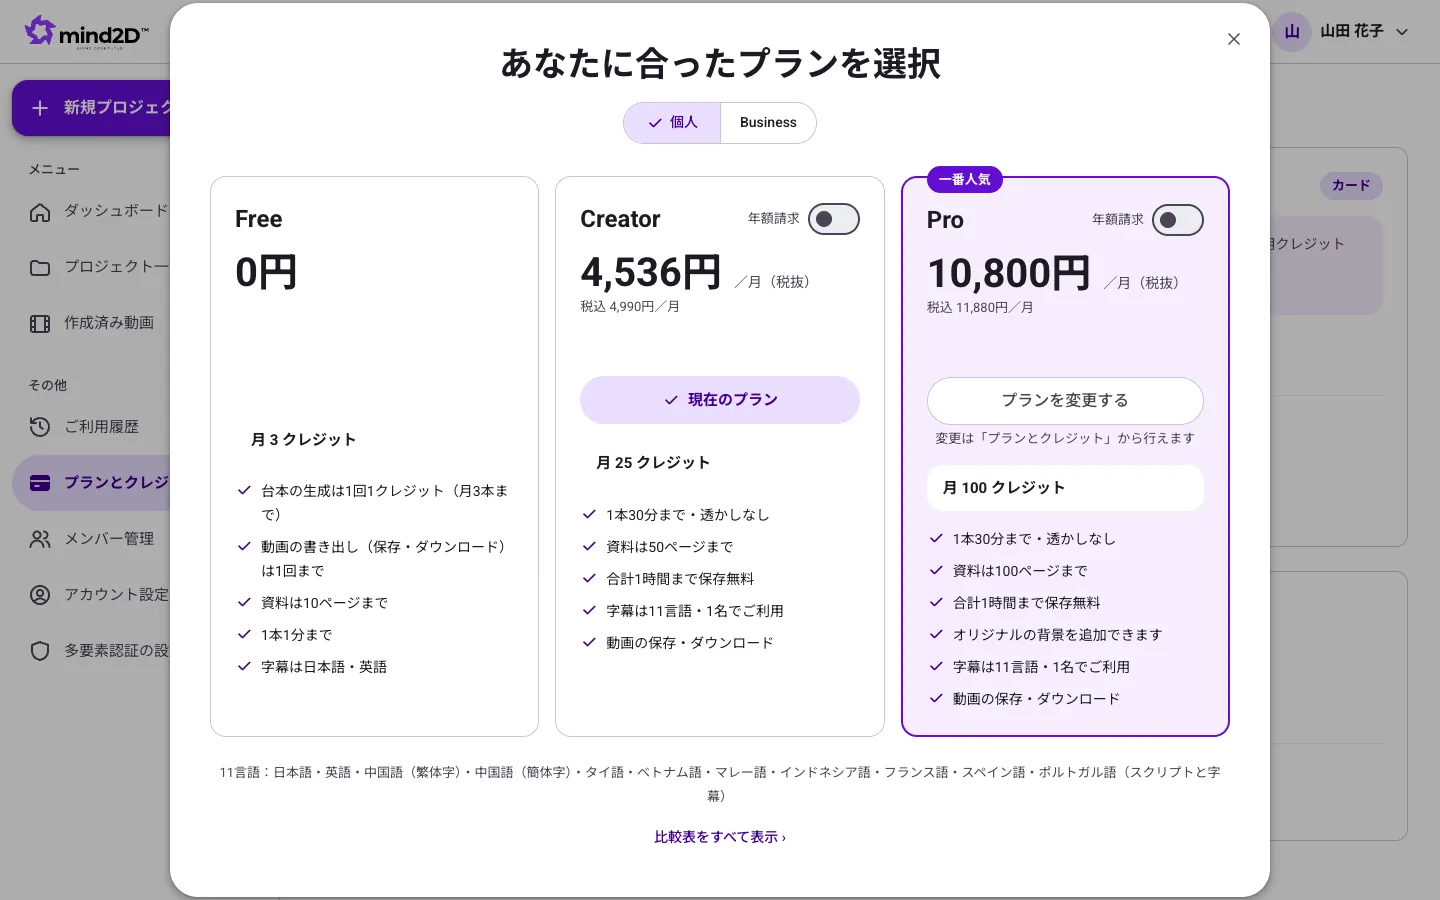
Script generation, exporting, translation and more use credits. Your monthly credits depend on your plan and refresh on the 1st of each month (Japan time).
Steps
- Open "Plans and credits" in the left menu to check your remaining credits and this month's usage.
- Press "Choose a plan" to see the plan list. Pick a plan and sign up by card.
- If you run low, paid plans can buy extra credits (extra credits carry over to the following months).
Good to know
- Export: 1 per 7 pages / Script generation and regenerating audio after a voice change: 1 per 14 pages / Subtitles in other languages and slide translation: 1 per 32 pages (anything under 1 is rounded up to 1).
- You can cancel anytime from "Plans and credits". You can keep using the service until the end of your billing period.
13. Cancel your plan
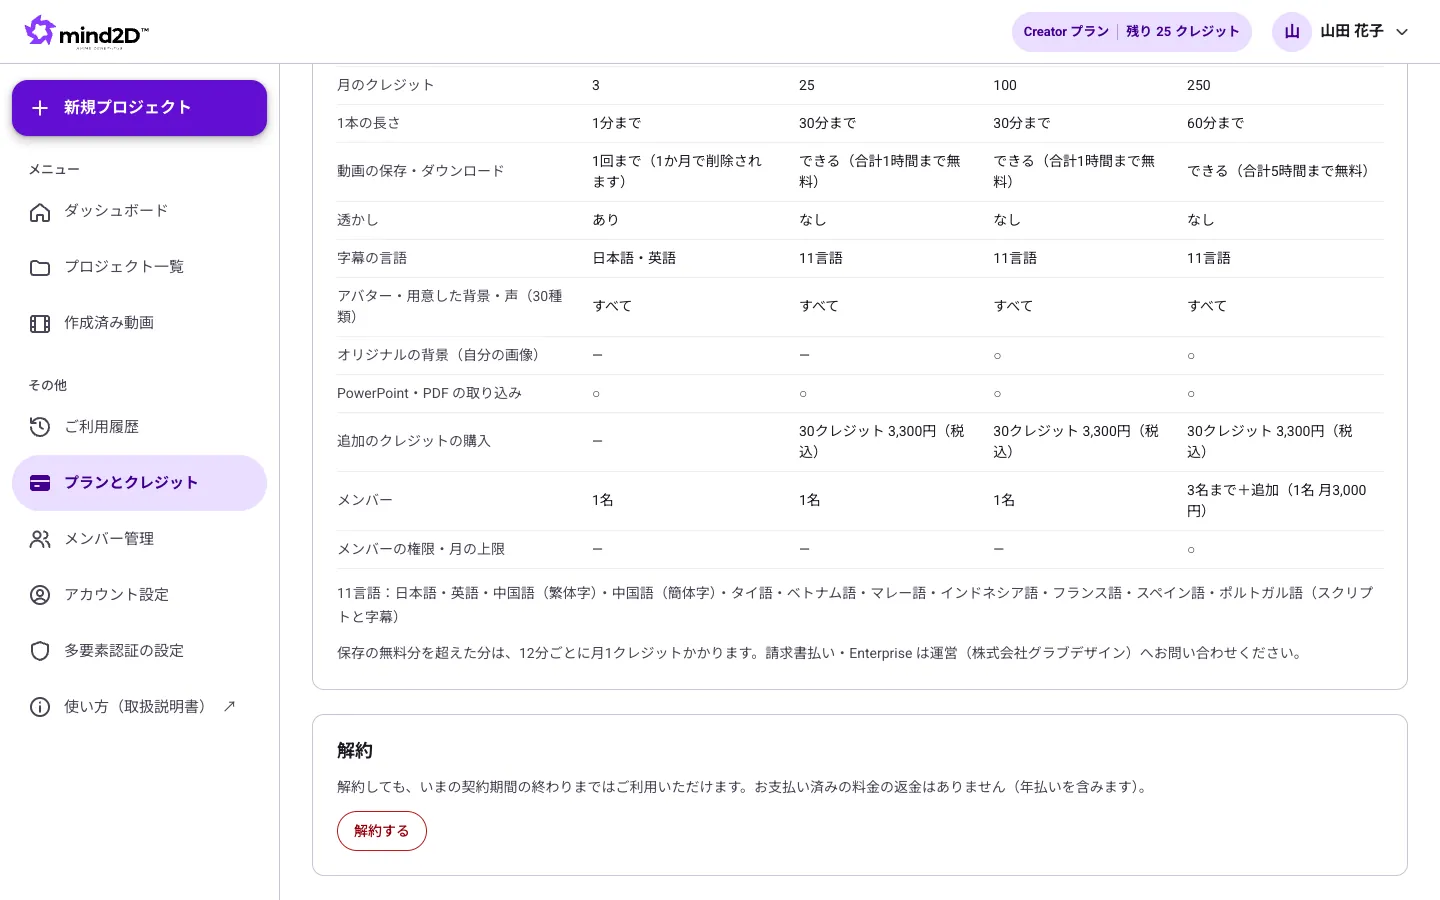
You can cancel a paid plan at any time from the "Plans & Credits" screen.
Steps
- Open "Plans & Credits" in the left menu and press "Cancel" in the cancellation section at the very bottom.
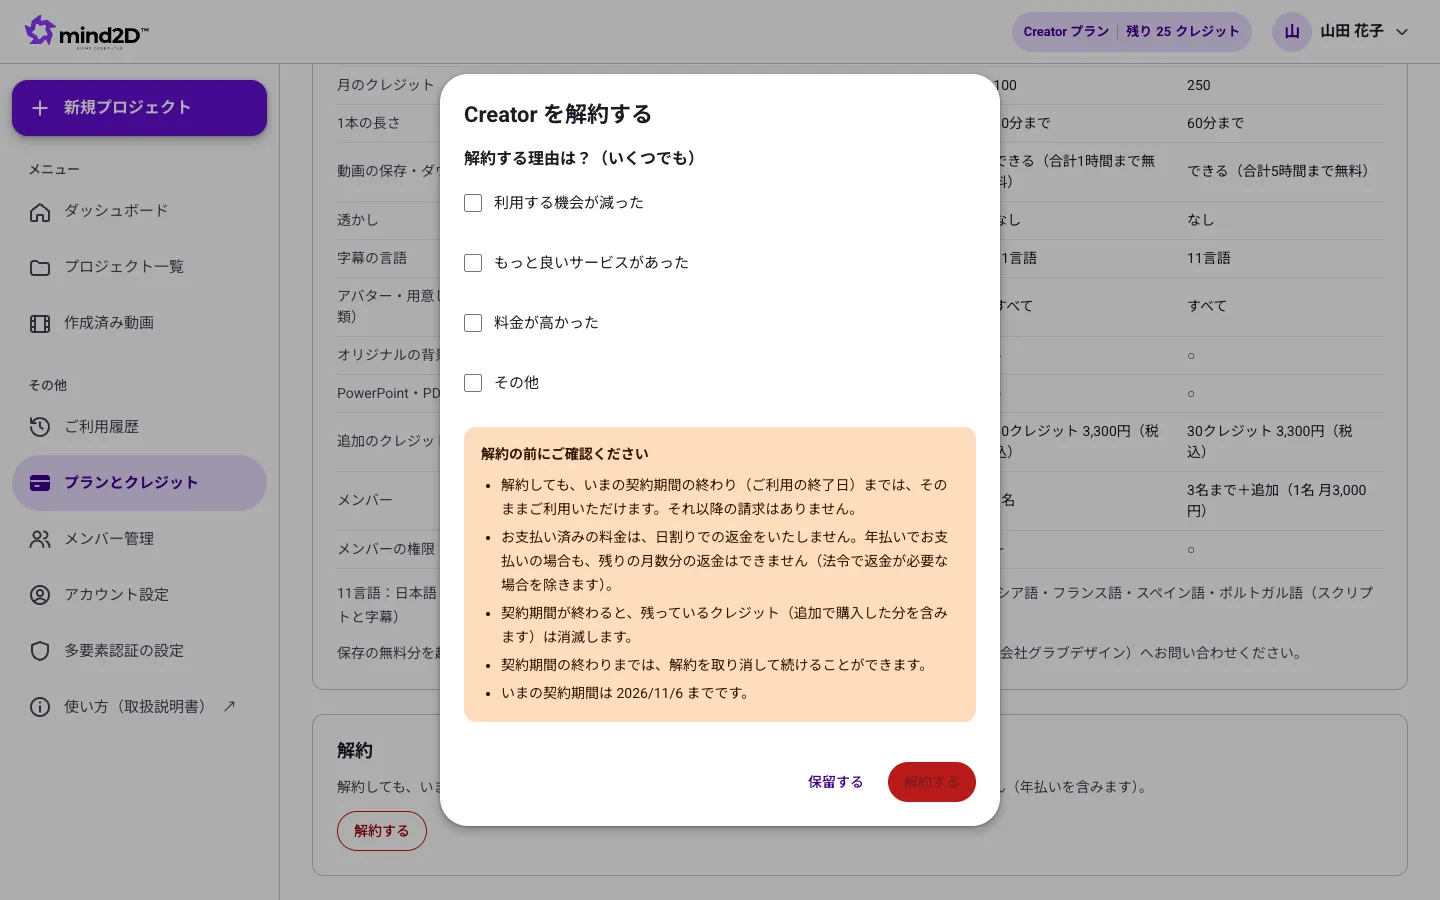
- Select one or more reasons for cancelling (you can choose as many as you like), then read "Before you cancel".
- Press "Cancel" to complete the process. You'll receive a confirmation email. To stop, press "Keep my plan".
Good to know
- Only your organization's administrator can cancel. If you're a member, please ask your administrator.
- After cancelling, you can keep using the service until the end of your current billing period. You won't be billed after that.
- Fees already paid are not refunded on a pro-rata basis (this also applies to annual payments). Any remaining credits expire at the end of the billing period.
- Until the end of the billing period, you can undo this with "Undo cancellation" in "Plans & Credits".
- To cancel a contract billed by invoice, please contact info@grab-design.com.
14. Add members (Business)
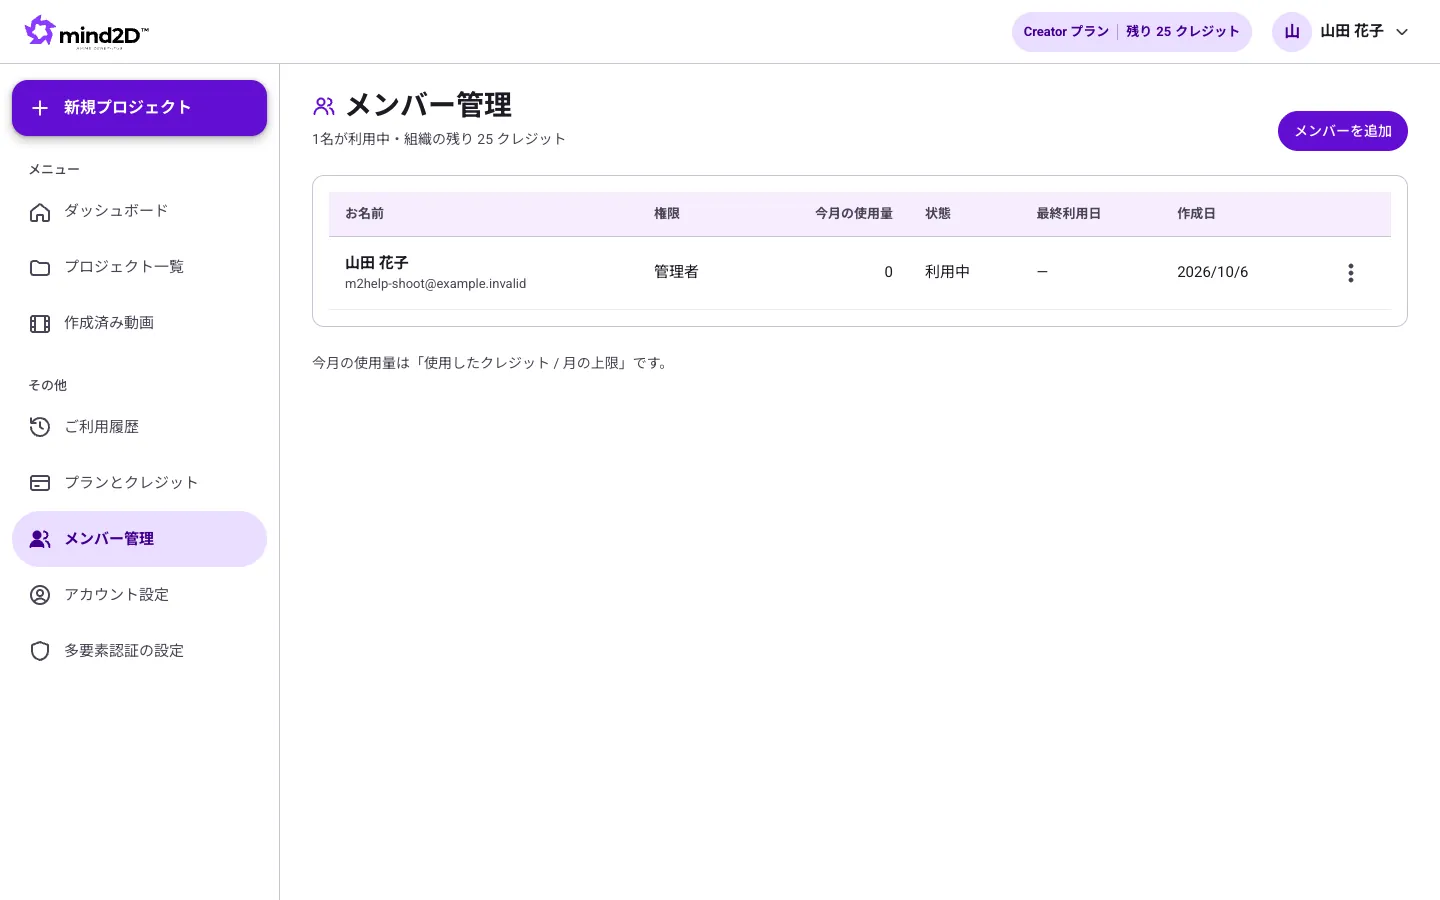
On the Business plan, you can add members to your organization and create videos from the same pool of credits.
Steps
- Go to "Member Management" in the left menu and press "Add member".
- Enter the name, email address, role (member / administrator), and monthly credit allowance, then create the account.
- Share the initial password shown on screen with that member (it's displayed only once).
Good to know
- The Business plan includes up to 3 people. From the 4th person onward, an additional fee applies per person.
Need help?
- My export stops partway through.
- Exporting runs inside your browser, so it can stop if you close the tab or switch to another tab for a long time. Please keep this tab open until the export finishes. If only the saving step failed, press "Retry save" to save again without re-recording.
- I edited the script, but the video hasn't changed.
- Your edits appear in the video once you export again. Press "Export with changes" at the top right of the screen.
- I want to fix how a word is pronounced.
- Rewrite the script text the way you want it read (for example, spell numbers out). To have just part of it read in English, use "Language switch mode".
- Can the text inside a PDF be translated too?
- Text inside slides can only be translated for PowerPoint (.pptx) files. Subtitles and scripts can be chosen from 11 languages even for PDF materials.
- I can't find the cancel button.
- "Cancel" is shown only to the administrator of an organization on a card-billed plan. If you're a member, please ask your administrator. For contracts billed by invoice, please contact info@grab-design.com. The Free plan requires no cancellation.
- I have a question about something else.
- Please get in touch through the contact form. A member of our team will reply by email.